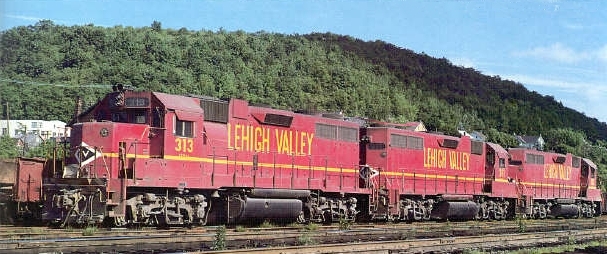
Prototype photo by Warren Calloway, Lehighton PA, June 9, 1974.
LV 311 from the new Atlas Master Series GP38, by Tom Haag
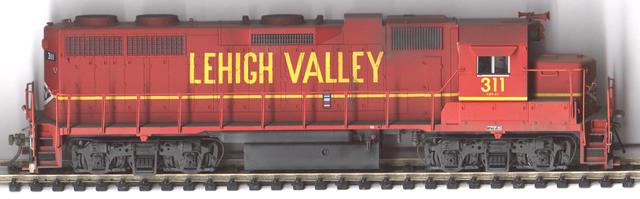
Tom Haag started with an undecorated Atlas Master Series GP38 and replaced the fans with the correct type without the dust cap, using a combination of Train Station Products and Detail Associates parts. He also used Stewart Blomberg B sideframes and Detail Associates clear class lights. Decals are by Microscale. (Photo by Tom Haag)
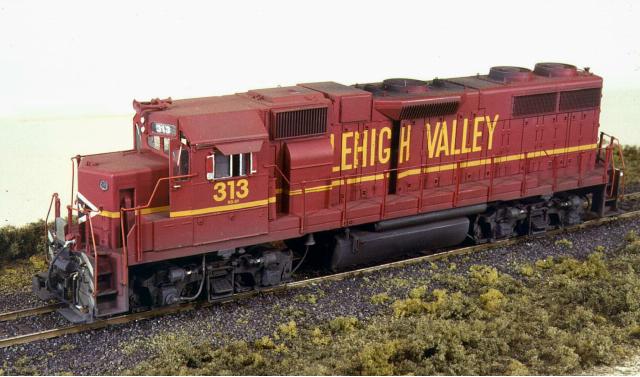
LV 313 kitbashed from the Athearn GP38-2 and original Atlas (Roco) GP38, by Jim Six
Adapted for the web from “Modeling the Lehigh Valley GP38 & GP38-2,” by Jim Six, MAINLINE MODELER, February 1987, p. 27, by permission of the author and copyright holder. Prototype photos by Warren Calloway. Model photography by the author.
Editor’s Note: This article was written in 1986, fifteen years before Atlas released their second version of the GP38. The version that Jim used for this conversion was made for Atlas by Roco, and is now sold by Con-Cor. The new Atlas release is clearly the better model, but there is a lot to learn in how Jim handled this conversion, including some observations on details of the LV’s GP38ACs, which differed in several respects from the GP38s seen on other roads. Some of these changes need to be made on the new Atlas GP38, too. The few short sections of the original article that dealt with the GP38-2 have been incorporated into the page for that model.
Blessed with an abundance of ALCO locomotives, an extensive variety of paint schemes, and a somewhat rugged topographical setting, the Lehigh Valley had for many years captured a following out of proportion to its size relative to neighboring railroads. Though ALCOs gathered considerable attention, the railroad rostered 16 of Electro-Motive’s utilitarian GP38 series locomotives – four GP38AC models (310-313) plus twelve newer GP38-2’s (314-325). Unlike the Dash-2’s, which ended up on the Delaware and Hudson and subsequently Guilford becoming 7314-7325, the four GP38AC units became wards of Conrail, 7656-7659. To the untrained observer, these locomotives appear nearly identical, with the most obvious visible difference between GP38AC and GP38-2 units being the application of black- and-white safety striping on the nose of the Dash-2’s. Lehigh Valley’s GP38AC’s had only a white-trimmed black diamond at each hood end; both models had safety striping applied to the pilots.
Modeling a GP38-2 presented no problem at all – Athearn produces an excellent model. Preparation merely required the addition of detail parts, paint and decals. [See article – Ed.] The GP38AC, however, was another story. Atlas offers an Austrian-manufactured GP38 long considered a standard for plastic HO scale diesel locomotives [now offered by Con-Cor – Ed]. However, considering the quality of the latest Athearn and Atlas (ALCO) models, it’s tempting to abandon older Atlas GP38’s in favor of Irv’s newer creation. Afterall, how difficult would it possibly be to back-date one to a GP38AC? As you may be able to determine from this article, “simple” somehow would be an inappropriate word to describe what actually transpired. Several differences between the GP38AC and GP38-2 preclude simple alteration of the Athearn model into its earlier cousin. To begin with, battery box doors are different, radiator fan spacing is greater, door arrangement at the rear half of the long hood is different, cab roof slopes are angled at the back on the GP38-2, etc., etc.
Though the Atlas GP38 model is good, in some respects it’s not of the same caliber as the new Athearn (or new Atlas ALCO’s for that matter). Several deficiencies present themselves. First is the cast-metal frame with its large “out-of-shape” fuel tank and that horrible vertical slot centered on each side. Considering the quality of the GP38 body shell, it’s amazing that Atlas settled for such a “gross” frame! The frame doesn’t offer prototypical appearance above the trucks either. The body “bulges” at the front and rear of both sides of the cab (required when making a one-piece injection molding of this type). And, not to be overlooked, the steps at either end of the frame don’t extend close enough to rail level, creating a “too-high-above-the-rails” appearance.
Out of the box, the Atlas model is representative of a very early GP38 – one manufactured before the now universal application of paper air filter elements (the protruding box atop the roof). The lack of this box dates the practical accuracy of the model. Few examples of GP38’s were to be seen configured as is the Atlas model much beyond the early 1970’s. In fact, most all such locomotives have since been “retrofitted” with the appliance. If you’re modeling the middle sixties and want a GP38, the Atlas shell is probably your best route. If your desire is a post-1970 era locomotive and you strive for authenticity, read on.
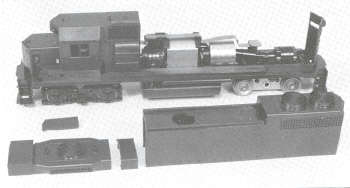
After carefully considering and examining both models, the decision was made to wed major components of both Atlas and Athearn models, incorporating the best features of each. A wish to maintain maximum compatibility [with the GP38-2 model] in operation and appearance was a major factor in making this decision. Additionally, the cab was to be discarded in favor of a Cannon and Company “thinwall” cab kit. Essentially, the GP38AC model (LV313) pictured on these pages consists of five basic components: 1) Athearn GP38-2 chassis/mechanism (see diagram); 2) Atlas GP38 long hood; 3) Athearn GP38-2 dynamic brake section; 4) the Athearn GP38-2 walkway/nose/hood section, and 5) the Cannon cab kit.
The Cannon & Company cab kit, hood doors, and inertial filter screens are relatively recent entrants to the diesel detail market and are of the absolute finest quality. Also included are several detail items of recent vintage and high quality. GP38AC 313 has the old style Blomberg-B truck side frames; the Blomberg-M side frames which come with the Athearn model were discarded in favor of the prototypically accurate B-types (also a standard Athearn item). No problem is encountered since one snaps off and the other snaps on in its place.
Before getting too deeply involved, study the bill-of- materials and gather any items you may not have at hand. It’s a good practice to begin with undecorated body shells – don’t needlessly spend time, effort and expense upgrading shells which are less than perfect.

For the GP38AC, the hoods are sawed from both Atlas and Athearn shells as pictured in the accompanying drawing. Remove the electrical cabinet air filter box located behind the cab on the fireman’s side of the locomotive. The resulting gap can be filled with a section of sheet styrene, then puttied and sanded smooth. The battery box doors on the fireman’s side are removed and replaced with a set from the engineer’s side of a second GP38-2 shell. Cut between the battery box door and panel attached to its right edge, then reassemble after reversing their respective positions.
Installed in the open position, Cannon & Company EMD hood doors aid in creating an impression of railroading – too busy for good maintenance. When assembling the hood sections, four doors were cut away and replaced with appropriate Cannon replacements, cemented in place in various open positions. The body shell is assembled as pictured.
Installing the Cannon & Company cab completes all major modifications, and should be assembled in place to assure a proper fit. The Cannon cab is an excellent product, having been faithfully reproduced to a degree of accuracy found on no other HO diesel cab – even to the point of having recessed louvers beneath the front engineer’s window! Front, back both sides, and roof, plus window frames, cab doors, rain gutters and sunshade brackets are all individual pieces and assembled in much the same manner as is a quality military model.
Remove cab parts from the sprue, carefully trimming each piece where it had been fastened. Mount the cab sun- shades, maybe off-center in their channels, adding to the impression of being used. Cut each sunshade from .005-inch sheet styrene then cement in place. An option worth considering is the installation of one or both cab doors in an open position as demonstrated by the two featured models. A cab interior is a nice touch, especially inviting if the cab door(s) is left open. Crew seating and an engineer’s control stand can be installed. Front and back cab walls are made by cutting two pieces of sheet styrene short enough to clear the mechanism, then cementing each over the hood openings. Don’t install cab windows until after painting the model. As a final touch, you may wish to position a crew in the cab.
Mount a Leslie RSL-3L-R air horn on the roof above the numberboard. Cab window wind deflectors from Detail Associates can be cemented to the cab sides flanking each window.
Drill holes for grabirons and roof-top lift rings. Don’t forget holes for the eyebolts beneath the rear corner of each radiator screen and the large curved grabiron immediately behind the rearmost fan. (Detail Associates’ curved caboose grab works perfectly.) Cement each lift ring and grabiron into place, except those which may interfere with decal placement; they can be added later.
Among the visible differences between the GP38AC and GP38-2 is the electrical cabinet air filter box situated immediately behind the cab (fireman’s side). Athearn’s Dash-2 model comes with the large newer version molded on, whereas Lehigh Valley’s GP38’s, though late-version 38’s, were fitted with the earlier smaller unit. Details West No.107 is the correct item called for and can be fastened behind the cab after cutting away the molded-on part. Careful study of prototype photographs reveals that drop steps on Lehigh Valley’s GP38AC’s porches are not those the seasoned diesel watcher has come to expect. The GP38AC, being an interim model between the earlier GP38 and the later GP38-2, used the same as those found on the Dash-2. Further, the twin parallel horizontal strips across the blower duct Gust behind the fireman’s side of the cab) are considered by many to be a Dash-2 spotting feature, yet the Lehigh Valley GP38AC’s display them. Not being one to ignore an opportunity to add realism, the decision was made to “open” several hood doors on the GP38AC. Those among us who witnessed eastern railroading during the troubled years of the early and mid-1970’s remember such typical occurrences as hood doors left open on numerous occasions. Depicting this somewhat less-than-enthusiastic observance of good maintenance practices conveys authenticity.

Several hood doors were cut away and discarded when kitbashing the body shell. Should you choose to do so, Cannon & Company offers an assortment of hood doors for most EMD locomotives, since and including the GP35. Take care to use the correct door type(s). Pay attention to hinges and latches as well as door height and width. Cannon hood doors are accurately detailed both inside and out. Don’t be afraid to expose the back side of a Cannon door. However, the internal mechanisms of model locomotives pose a challenge to even the experienced modeler in disguising its very unprototypical appearance. Consider painting the visible components flat black to help hide them from the viewer. Several modelers having had an opportunity to examine 313 closely have been duly impressed with the effect, not only by the open hood doors, but also those of the cab.
Athearn’s trucks faithfully capture the look of the prototype Blomberg truck (both the “B” and “M” types). The GP38-2’s fuel tank, as well, is of proper cross-section with length representative of the standard offering from Electro-Motive – just right for Lehigh Valley locomotives. The only major change needed to prepare the GP38-2 chassis for the GP38AC body shell is swapping its type-M truck side frames for type-B counterparts, simply a matter of snapping off the M’s and snapping on the B’s. GP38AC’s trucks appear to be from trade-in locomotives using older type axle journals.
Detail Associates offers a variety of axle journals used on EMD locomotives, covering most types except the very latest. Matching journals on a model with those of the prototype is a simple task. Remove the molded-on units and cement the correct replacements into place. A small auger bit fitted to a motor tool works fast. Carefully study photos of the prototype to determine the combination of journals needed to match your prototype and cement the replacements into position.
Lehigh Valley GP38AC and GP38-2 locomotives have relatively small fuel tanks in comparison to those of many GP and SD locomotives -understandable considering their normally aspirated 2000-horsepower engines compared to the turbocharged high-horsepower prime movers of the 40’s and 45’s. The small fuel tanks result in additional open space and, for that reason, the models beg for added detail. Sand pipes to the trucks, bell, filters, fuel fillers and fuel gauge are almost immediately noticed. Small service lights located to the rear of each front jack pad and the speed recorder drive unit with cable further add to the effect. With its abundance of open space beneath the frame, Athearn’s GP38-2 mechanism provides a near-perfect showcase for these features. Plastic sheathing from No.32 stranded wire makes excellent HO scale sand pipes, flexible enough not to interfere with truck movement. Unlike the Dash-2’s type-M trucks, the GP38AC type-B trucks have no ready-and-waiting sand pipe holders. Drilling a small hole in each truck’s outboard brake rigging (at the four corners) cured the deficiency. Angle the holes to line up the sand pipe. Cut pieces of wire long enough to extend to the bottom of the frame in a gentle curve. Secure each to the trucks using ACC cement.
Over the years, Lehigh Valley used several shades of red paint and, in fact, to many followers the railroad is remembered more for its variety of paint applications than anything else. Pinpointing an exact color for the road’s GP38AC and GP38-2 is as much a matter of taste as it is of maintaining historical accuracy. Careful examination of paint chips and color photography revealed no consistency from locomotive to locomotive. It’s relatively safe to assume that exposure to the “elements” faded the color – particularly in later years – and dirt and grime gave the impression of a darker color, especially when wet. Paintovers of the words “Lehigh Valley” with fresh LV red paint following Conrail day (April 1, 1976) make this apparent – fresh paint is invariably darker and richer than the surrounding older paint.
I did not want both locomotives to be exactly the same color, so the paint used for GP38AC 313 was lightened by adding Caboose Red to the base color. The basic color is a mixture of about 50% Accu-paint Cornell Red, 25% Floquil Signal Red, and 25% Floquil Caboose Red. The paint mixture is then diluted to about 50% with lacquer thinner. No primer or Barrier was used. Spray on initial coats fairly “dry” (a lot of air and not much paint) to avoid attacking the plastic surfaces. Subsequent coats can be applied increasingly “wet” (more paint and less air) until the black plastic is thoroughly covered. Since horizontal surfaces receive more sun exposure, consider adding a few drops of white, then spray these surfaces again to represent greater fading.
At the time of this writing, the best decals available for either locomotive were offered by Herald King. Though apparently intended for Lehigh Valley U23B locomotives, they offer correct lettering and striping, with the exception of the nose safety striping on the GP38-2. Taking care to align safety stripes with the class lights leads to accurate placement. A close look at prototype locomotives reveals a lack of consistent placement. (Oh well!) One thing about the 313 was to leave the numberboards unpainted and apply decal numbers directly onto the clear plastic. Results closely depict the prototype.
Before adding final detail, pilot facings are brush-painted black, and white safety stripe decals are added. Unlike those found on the GP38-2, which form a series of “V’s,” the GP38AC’s stripes are arranged from the upper left to the lower right across the width of the pilot facing. Cut levers, pilot grabirons and MU hoses can then be added.
The last major step in preparing your new Lehigh Valley locomotive is installation of stanchions and railings. Railings are formed from .016-inch wire. (Avoid unprototypically thick railings like those supplied with the Athearn GP38-2 and other locomotives.) Individual railing sections should be measured then shaped using a small pair of needle-nose pliers. Slip each stanchion over its railing wire and carefully tap the assemblies into place. Align everything, then apply ACC cement for rigidity. Spray or brush the railing assemblies with the red paint. Railing ends are painted orange – SP Daylight Red (really a deep orange) will work fine.
Weathering played a major role in the often subtle though constantly changing appearance of the locomotives. You may even consider the time of year you (theoretically) operate your model railroad – locomotives and equipment are much dirtier during winter months than during the summer. Mix weathering colors “thin” – about 80% or more lacquer thinner. In this way, effects resulting from weathering agents can be built up gradually to suit your desires.
Reflecting back upon this two-locomotive project, a few observations are called for. First, the GP38-2-to-GP38AC body shell conversion was well worth the effort. The consensus among those having closely observed both models is that the converted GP38AC is the superior model. Its Atlas radiator grilles and hood doors are better. Doors of Atlas hood-type diesels are outlined by recessions rather than slabs laying on top of the surface. Second, enough of the Athearn GP38-2 has been retained that the model appears to be Athearn – mechanism, pilots, walkways, nose and dynamic brake section are Athearn. Near 100% compatibility is a reality. Both units are Cannon cab-equipped and both display essentially the same details. Without doubt, the intended impression of the two locomotives being family has been achieved.
Considering the frequency at which HO locomotives have been appearing in recent years, excitement and anticipation have become the norm among diesel modelers – both first-generation and contemporary buffs alike. We can now direct attention to working with existing models rather than devoting time to kitbashing unavailable models. Who knows what may show up at the “corner store” any day? Detail manufacturers like Cannon & Company, Detail Associates, Details West, Warren’s Custom Services, and a host of others specializing in diesel detail parts, make it a simple task to push the fidelity of models beyond that of the best brass imports and at considerable savings. One can only wonder what locomotives and details loom just over the horizon. It’s beginning to make sense to stick with detailing and painting projects and shelve the involved “slice-and splice” affairs.
BILL OF MATERIALS |
|||
| Quantity | Manufacturer | Part No. | Description |
| 1 | Athearn | 4626 | Undecorated GP38-2 w dynamic brakes |
| 1 | Atlas (now Con-Cor) | Undecorated GP38 body shell | |
| 1 | Cannon | TC-1502 | 35-line thinwall cab kit |
| 3 | Cannon | HD-1001 | EMD hood unit doors |
| 2 | Cannon | EMD inertial air intake grilles | |
| 8 | Detail Associates | 102213 | Brass coupler lift bar bracket |
| 2 | Detail Associates | SY 2205 | Coupler lift bar – formed wire type |
| 13 | Detail Associates | 101101 | Brass lift rings |
| 1 pkg | Detail Associates | TK 2806 | Diesel truck journal – Blomberg slope |
| 1 pkg | Detail Associates | TK 2805 | Diesel truck journal – Blomberg square |
| 1 pkg | Detail Associates | SY 2208 | Pilot w/footboard – metal type |
| 1 pkg | Detail Associates | 1508 | MU hoses |
| 1 pkg | Detail Associates | 1404 | Dash-2 type drop steps |
| 1 | Detail Associates | 6503 | Curved caboose grabiron (rear roof top) |
| 1 pkg | Detail Associates | 2202 | Diesel grabirons – formed wire type |
| 4 pcs | Detail Associates | 2505 | Brass wire for railings |
| 1 pkg | Detail Associates | 2304 | Cab wind deflector set |
| 1 pkg | Details West | HL-117 | Pyle type sealed-bean headlights |
| 1 | Details West | BE-127 | Bell, frame mount type |
| 1 | Details West | AH-190 | Leslie RSL-3L-R air horn |
| 2 | Details West | SL-172 | Engine step and service lights |
| 1 | Details West | 107 | Electrical cabinet air filter box |
| 1 pkg | Details West | 139 | Fuel tank air filter set |
| 1 pkg | GSB | 3405 | Windshield wipers |
| 1 | GSB | 3305 | EMD cab interior kit |
| 1 | Herald King | L-859 | Lehigh Valley locomotive decals |
| 1 pr | Kadee | No. 4 | Kadee No. 4 or No. 5 couplers |
| 1 pkg | MV Products | LS 22 | Headlight lens |
| 1 pkg | Overland Models | 8915 | Speed recorder drive w/ cable |
| 1 pkg | Overland Models | 8012 | EMD fuel tank sight glass |
| 1 pkg | Overland Models | 8000 | Diesel coupler pockets |
| 1 pkg | Overland Models | 8010 | MU stand w/ plug installed |
| 1 pkg | Overland Models | 8011 | MU cable w/ plug |
| 1 pkg | Pacific Fast Mail | Blomberg-B truck detail kit | |
| 1 pkg | Pacific Fast Mail | EMD prototype stanchions | |
| 5 | Proto Power West | 13002 | Lead weights |
| 1 | Proto Power West | Athearn diesel repower kit | |
| 2 | Precision Scale Co. | 39079 | Brass EMD fuel tank filler pipes |