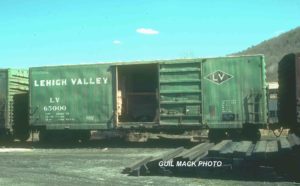
 LV 65000 is the first of the USRE PS-1 rebuilds. Guil Mack photo. |
 LV 66228 is a rebuilt Bethlehem Steel AAR style car. Campbell LVRR web site |
Those who model the LVRR in the late 1960s & 1970s will need a good number of these PC Green 40 ft boxcars on their roster. These cars were taken from series 62000 (PS-1s) and 63000 (Bethlehem Steel built, AAR design) originally purchased in 1947 through 1950, sold to US Railway Equipment for rebuilding in 1969 through 1973, and then leased back by the LVRR. The PS-1 rebuilds became the 65000 series, while the AAR rebuilds became the 66000 series. See the listings for these series, with references to additional photos, on the LVRR Modeler Freight Cars prototype page.
|
|
 LV 65051 is another PS-1 rebuild, this time with a 5-panel Superior door. Guil Mack photo. |
 LV 66138, one of the Bethlehem Steel-built AAR cars that were rebuilt. Photo by Charlie Houser, Allentown, 1-12-74. |
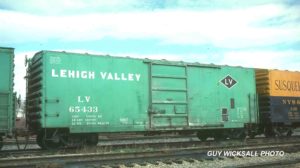 LV 65433 is also a PS-1 rebuild, again with the 5-panel Superior door. Guy Wicksall photo, from the collection of Guil Mack. |
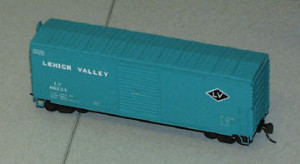
 Phil Buchwald modeled LV 66234 from the Roundhouse MDC modern 40 ft boxcar kit. See a description of how he built it below. |
| Modeling the USRE Rebuilds There is an excellent article by Wayne Sittner on page 73 of the August 1981 Railroad Model Crafstman that provides a lot of detail about the prototype cars, and how to model them with kits available at that time. There are much better choices for a starting point now, but there is never likely to be a commercial model of these exact cars. If you are satisfied with an out-of-the-box model, one of the commercially painted kits may suit your needs. If you want to make it look more like the prototype, you’ll need to do more, however. How much is up to you – we all have our own balance points for accuracy vs. time and cost! My own personal minimum standards (in order of importance to me) would be:
OK, that’s the minimum that would satisfy me – your list may be different. Of course, what I’d really like is a kit that is completely accurate in terms of door type, roof type, proper end panels, etc., and which involves the minimum amount of work in removing the roof walk and shortening the A-end ladders. I’m resigned to adding the reinforced side sills on any kit that I buy. What are the best kits out there to use as starting points? Since I model in HO scale, that’s where I am doing some research. This article will be a work-in-progress for a while, so if you have some ideas to add, drop me an e-mail note! (This article was precipitated by a note from Mark Nolan, who is looking into having a custom painted run done in this paint scheme. Once we started comparing notes, it became apparent that there are several possibilities, if availability of the kits and custom painting services is assumed – which may be questionable in a few cases.) Kit Survey |
|
| 40 ft PS-1 Boxcars | |||||||
| Manufacturer | Pullman Standard | Accurail | Cannonball Car Shops |
Inter- Mountain |
Kadee | McKean | Walthers |
| Kit number | LV 65000 series | 3400 series | 40000 | 40494,40495 | 4000, 5000 | 700 | 3700 series |
| MRSP | $11.50 undec to $14.95 |
$24.95 undec | |||||
| Comments | Custom painted runs of 48 cars available. A lot of work to remove the roof walk, though. | A “flat” kit in which the body needs to be assembled. Out of production? | Looks like the best bet. Custom painted runs have been done, terms unknown. | Pricey, but a great choice if you ignore the door width. | Out of production | Probably ex-Train Miniatures kit. Out of production | |
| Length | 40′-6″ IL | ||||||
| Height | 10′-6″ IH | ||||||
| Sides | Welded, 10 panels | Welded, 10 panels | Welded, 10 panels | Welded, 10 panels | Welded, 10 panels | Welded, 10 panels | Welded, 10 panels |
| Doors | 7 ft Superior, 5, 6 or 7 panel 1 |
8 ft Youngstown or P-S diamond panel | 7 ft P-S diamond panel | 7 ft Superior 6 panel | 6 ft or 8 ft Superior doors, 5 or 7 panels | 8 ft P-S 5 diamond panels | 7 ft Superior 7 panel |
| Roof | Pullman Standard 2 | Pullman Standard 10 raised panels/2 flat; mold mark in center at rib | Pullman Standard, 12 raised panels | Pullman Standard, 12 raised panels | Pullman Standard, 12 raised panels | Pullman Standard 10 raised panels/2 flat; mold mark in center at rib | Pullman Standard 12 raised panels; mold mark on center rib |
| Ends | Pullman Standard | Pullman Standard 5/4/1 | Pullman Standard 5/4/1 | Pullman Standard 5/4/1 | Pullman Standard 5/4/1 | Pullman Standard 5/4/1 | |
| Roofwalk | Removed, brackets left in place 3 | Small mounting holes in roof at ribs | No mounting holes in roof | No mounting holes in roof | No mounting holes in roof | Large mounting holes in roof at ribs | |
| Ladders | Full height 7 rungs on B-end, cut down to 4 rungs on A-end | Full height 7 rungs, molded on | Separate 7 rung ladders | Separate 7 rung & 4 rung ladders | Separate 7 rung ladders | Separate 7 rung ladders | Full height 7 rungs, molded on |
| Side sill | Reinforced | Tabbed | Tabbed | Tabbed | Tabbed | Tabbed | Tabbed |
| Trucks | |||||||
| PS-1 notes: 1. As built, 7 panel Superior doors were used, but on the rebuilds, 5 panels appear to have been the most common , with the occasional 6 or 7 panel doors 2. Some roofs were replaced in whole or in part with diagonal panels 3. Angled grab irons were mounted directly to the roof on the B end. |
|||||||
| 40 ft AAR Boxcars | |||||||||
| Manufacturer | Bethlehem Steel | Accurail | Athearn | Branchline | CB&T Shops | Front Range | Inter- Mountain |
MDC Roundhouse |
Red Caboose |
| Kit number | LV 66000 series | 1200 | 1600 (undec) |
13200 (undec) |
40XX series (early) | 40898, 40899 (undec) |
1123 | 8600, 8700 (undec) |
|
| MRSP | $8.98 | $12.98 | $8.98 | $10.95 undec to $14.95 |
$8.50 LV 66065 |
$12.95 undec to $14.95 |
|||
| Comments | Custom painted runs of 48 cars available | Available custom painted from several suppliers | Without question the best kit to use! | Availability of kit and status of company questionable | Out of production | A very nice kit, but not of an LVRR car! | Has riveted sides and reinforced sills. | Very nice kit; a good choice if you can accept 6 or 8 ft doors | |
| Length | 40′-6″ IL | ||||||||
| Height | 10′-6″ IH | ||||||||
| Sides | Riveted, 10 panels | Riveted, 10 panels | Riveted, 10 panels | Riveted, 10 panels | Riveted, 10 panels | Riveted, 10 panels | Riveted, 10 panels | Riveted, 10 panels | Riveted, 10 panels |
| Doors | 7 ft Youngstown 6/6/5 | 6 ft Youngstown 6/6/5 | 6 ft Youngstown 4/6/3 | 7 ft Youngstown | 7 ft | 6 or 8 ft Youngstown, 6/6/5 | 6 ft Youngstown, 5/6/5 | 8 ft Superior door | 6 or 8 ft Youngstown, 6/6/5 |
| Roof | 10 diagonal panels/2 flat end panels | 10 diagonal panel/2 flat panel; mold mark in center at rib | 10 straight panels/2 flat end panels | 10 diagonal panels/2 flat end panels | 10 diagonal panels/2 flat end panels | 10 diagonal panels/2 flat end panels | Straight panel | 10 diagonal panels/2 flat end panels | 10 diagonal panels/2 flat end panels |
| Ends | Improved Dreadnaught 4/3/1 | Improved Dreadnaught 4/3/1 | Dreadnaught 5/5 | Improved Dreadnaught 4/3/1 | Improved Dreadnaught 4/3/1 | Dreadnaught 4/4 | Dreadnaught 4/4 | Improved Dreadnaught 4/3/1 | |
| Roofwalk | Removed, brackets left in place 1 | Small mounting holes in roof at ribs | Large mounting holes in roof | No mounting holes in roof | No mounting holes in roof | No mounting holes in roof | No roofwalk | No mounting holes in roof | |
| Ladders | Full height 7 rungs on B-end, cut down to 4 rungs on A-end | Full height 7 rungs, molded on | Full height 7 rungs, molded on | Separate 7 rung ladders | Full height 7 rungs, molded on | Separate 7 rung & 4 rung ladders | 4 rung ladder molded on B-end side, but 8 rung ladder on end. | Separate 7 rung ladders | |
| Side sill | Reinforced | Tabbed | Tabbed | Tabbed | Tabbed | Tabbed | Tabbed | Reinforced | Tabbed |
| Trucks | |||||||||
| AAR notes: 1. Angled grab irons were mounted directly to the roof on the B end. |
|||||||||

| Replace the side ladder with a full height Detail Associate part on the B end.(Actually, I replaced the A end shortened ladder too… trimmed this one off by mistake before I realized that I was working on the wrong end! But it is OK, because the ladder uprights extend down below the bottom edge of the side panel, and so do the DA parts. (“Yeah, yeah, I meant to do that!”) The original cast-on ladders came off in cool looking curls, all in one piece! About 30 seconds worth of sanding and they were ready for the new ladders! Just be careful of the rivet lines right next to them.In general, it went really easily. The plastic is rather soft, and takes a knife very well. I didn’t have to do any filling. The only work not specifically related to the kitbash was to sand off a slight mis-match step between the roof and end panel on the B end. Not really necessary, since the new “/1” end rib could line up its top edge with this line, but I didn’t know that until I got that far.
Painting and Decaling The paint is Floquil #110330 N.Y.C. Jade Green. I mix Floquil about 2/3 paint to 1/3 thinner to spray. Then I put Floquil Crystal Clear gloss on before decaling. I thin this about 50-50, and put it on in several light (but just barely wet – so it flows) coats, as the clear tends to run fairly easy. After decals are applied, I sprayed over everything with Testors Dullcote, mixed about 50-50 with lacquer thinner. I spray Floquil mixed only with thinner and am very happy with the results… I don’t add any glaze or other additives to the color mix. (I always used Testors colors until about a year ago. I’ve read some articles in MR and RMC where folks mix glaze, etc. in with the thinner, but these were older articles. Maybe Floquil has re-formulated their paints since these were published. Anyway, I am very pleased with the results of the above formula.) The decal set is Microscale 87-261. This set is specifically for the rebuilt LV cars. (I had some trouble with these decals. I assume that they don’t have a real big demand for this set, since it is so specialized, and the set that I received was old. They started falling apart when I tried to apply them. I was able to save most of them by giving them a coat of Microscale’s decal saver, but lost the little “USA map” logo and free-handed it with a white gel-pen. I’d like to try making a PS-1 car, but will test the next set to make sure that the decals don’t come apart again. The 87-261 set also covers a Nickle Plate hopper and a Santa Fe box car, so there are some unwanted decals to do a test on first.) After I finished the painting, I noticed that the door is 8 ft wide, rather than 7 feet, but it still gives the right look. Also, the trucks are wrong… didn’t even see this until I opened the little baggie what holds all the hardware. MDC put in a pair of three coil modern trucks. I’ll swap them out when I get enough lunch money saved up!- Phil Buchwald (buchwaldfam at globalnetisp dot net)A few months after Phil wrote his review, MDC released this car in the PC Green scheme for LV. It is kit #01123, and is numbered for LV 66065. Except for the modifications that he made to improve the ladders and ends, and that some of the markings are missing, it is comparable to Phil’s model. – Ed |
|||