History
The 41000 series of LV 70 ton hoppers started life as composite hoppers in 1929. In 1949, they were all rebuilt as steel hoppers. The self-clearing, 4-bay cars had a capacity of 140, 000 lbs. There were 128 still on the roster January 1, 1960.
Parts List
- 1 Hobbyline Hopper car – these hoppers are out of production but can be found on ebay. Unassembled models are preferable, but assembled models can be used. My only caution when using ebay is that you make sure that you are getting a hopper and not the gondola. Some sellers do not know the difference.
- 1 set of Athearn 40′ quad hopper doors – Athearn stock number 17503.
- 1 set of Champ decals # HG-103, Lehigh Valley Gondola – as you should be aware, Champ is selling off all remaining decals and will not reprint any. This decal is still available but may not be in the future. My sets did not include the LV black diamond herald. I contacted Champ and they sent them along. Check any that you purchase.
- 1 pair of Eastern Car Works, National C-1 Friction Bearing Trucks – Walthers catalog # 117-9059
- 4 Life-Like 33″ freight wheelsets
- 2 Kadee # 148 couplers, coupler boxes and bases
- Flat grey primer, any brand
- Scalecoat II, oxide red paint
Modeling Directions
After procuring a Hobbyline hopper, place it in a stripping solution like Chameleon. The 1950’s paint and decals will come off very quickly. If you have a fully assembled model, put it in the stripper after removing the trucks but before attempting to remove the center beam. Depending on the glue that was used to assemble the model, the stripper may actually soften the glue and cause the beam to come out easily.
If the beam does not come out easily, gently pry it out with a small screwdriver. If you break it, do not be upset – it is a channel beam so repair and reinforcement should not be difficult.
Once the hopper is completely stripped, rinsed off and dry, use a Dremel tool to remove the small ridges at the base of each hopper door (Fig. 2321). After removing the ridges and sanding the area, cut each Athearn hopper door from the others and glue one to each sanded base (Fig. 2322 and 2320).
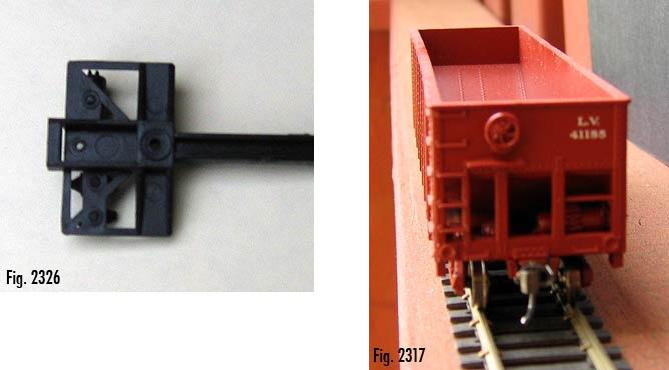
Glue the air reservoir and other items into their appropriate places at the end of the center beam, cut out the small plastic studs in the coupler pockets with the Dremel (Fig. 2326), cover the coupler pockets with a small piece of masking tape and spray the center beam and hopper itself with flat grey primer.
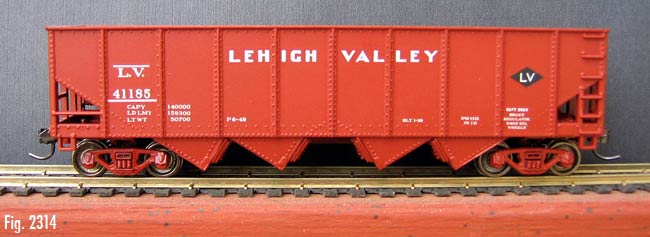
While you are waiting for these items to dry, assemble the National C-1 Friction bearing trucks with the 3 spring section on the outside. Check the reference photos and Fig. 2314.
Put very small pieces of masking tape over the 4 axle point pocket holes on each truck (so that you don’t fill the holes with paint) and spray the trucks with the same flat grey primer.
When all items are completely dry, spray all primed items completely with Scalecoat II oxide red paint. Obviously, this process will take a number of coats of paint to cover everything.
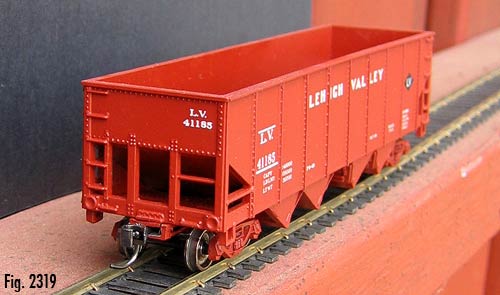
When all painted parts are completely dry, decal the hopper body as shown in the reference photos and in Fig. 2314, 2317 and 2319. Please note that if you use Scalecoat paint, the surface will be glossy and ready for decaling without any further preparation. If you use a flat paint, you will need to spray on a coat of Glosscoat and allow it to dry before decaling.
If you want your decals to be absolutely prototypical as shown in the photos, you will need to piece numbers and letters together to make the correct wording and numbering. You may also need very small numbers and letters not available in the HG-103 set. I used decals from other sets that I had around the house. Microscale makes small white decal lettering sheets that would also meet the requirement.
Use Microscale decal setting solution (red or blue bottle) to make your decals “melt”, using a needle to prick air bubbles after the initial setting solution has evaporated. Then re-administer the solution.


When you are satisfied with your decaling work, spray the decaled areas with Glosscoat. This will cause your decal film to disappear. When the Glosscoat is dry, glue the center beam back in (making sure that the ends are in and flush) and spray the model with Dullcoat. Spray the trucks with Dullcoat as well, but don’t put them in place yet.
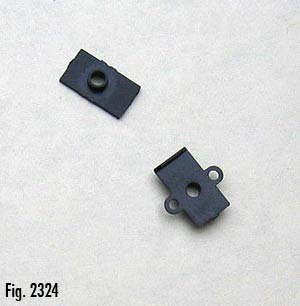
When everything is dry, turn the model over, remove the tape covering the coupler pockets, cut the round “ears” and the lip (depending on the width of your coupler pocket, you may have to trim the sides of the coupler box base) from the base of a number 5 Kadee coupler box base, (Fig. 2324) and glue the base in the pocket. You now have the ability to mount a Kadee #148 coupler. On my first 2 models, I mounted Kadee number 5 spring boxes and couplers as well because 148 couplers were not yet available. While you can still do that, you may find that you will have to do some further clearing with the Dremel tool to make sufficient room. On some of the Hobbyline hoppers, there is a yoke at the end of the coupler box (Fig. 2326). I recommend that you insert your #148 coupler through the yoke, into the box and onto the stud. If you need to ream out the yoke do so, but don’t cut the yoke out.

Take the coupler box cover that comes with the Hobbyline hopper and place it over the pocket. Using a number 52 drill, bore a hole through the cover (some of the covers actually have a smaller hole already in the right place), through the middle of the Kadee stud and through the base of the coupler box. Tap all three with a 1-72 tap and tighten a 1-72, 3/16″ or 1/4″ screw into the box (Fig. 2320).
At this point you may have to do some touch up work with a brush and some oxide red paint. I brush painted the coupler box cover and the brake wheel at this point. The coupler box cover was already screwed into place while the brake wheel was not yet attached. If you don’t like the Hobbyline brake wheel, you can replace it with another type. You may, however, have to drill the mounting hole out to make it a little larger.
Now, I removed the bits of tape from the truck axle point pocket holes and mounted the wheelsets. I also noted that the truck mounting screws provided with the Hobbyline hopper will not do a very good job with the Eastern Car Works trucks. So, I took one of the screws to a local Hardware Store, matched the threads with a round headed screw and bought the screws and small washers to go on under the round head (Fig. 2320).
You now have a hopper that looks as good as some of the recent releases. In fact, one member of my Club asked me who had released those hoppers. I enjoyed telling him “Hobbyline, 50 years ago”.
Here are some things you can do to make your hopper serve and run better. While my cars run quite well, you can add weight to them. First, I recommend that you get #8 birdshot and put equal amounts in each of the door reservoirs on the inside bottom of the car. Put white glue in the reservoir first, add the shot and then, using an eye dropper, put a mixture of white glue and water on top-just like you would do in ballasting track. Be very careful to use equal amounts of shot on each side or your car will lean. As far as total weight, I would advise using NMRA recommendations as guide.
If you want to put a coal load in the car, I would recommend a Blue Mountain coal load for the Athearn 40′ quad hopper. It fits in the car, although it may go too far down. You can easily correct that with small plastic shims or some more foam under the load. Additionally, Blue Mountain loads look like anthracite coal, and that is what the LV was all about!
I have not weathered my cars yet, but hope to do so. I would recommend that you do so once the car is fully assembled.
I hope that you will enjoy building these unusual, but impressive, Lehigh Valley hoppers. Should you run into any difficulty, please let the ARHS know and they will contact me. I promise to get back to you as soon as I can.
Enjoy!!
Harry Owens
References:
Page 58, The Steam Era of Lehigh Valley by Chuck Yungkurth. (Full side view of hopper 41185).
Page 19, Trackside Around Sayre-Towanda-Waverly with Lloyd Hall. (View of front truck and front left corner of hopper 41611).
Lehigh Valley Railroad Company Summary of Equipment from George Elwood’s website.