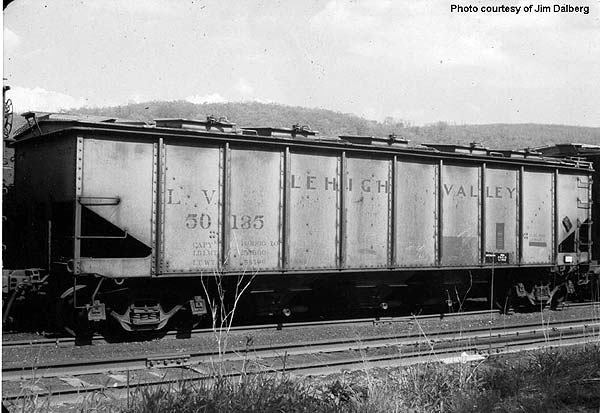
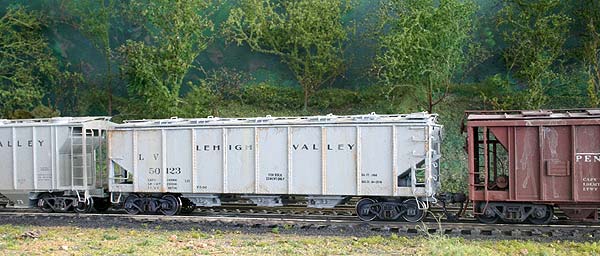
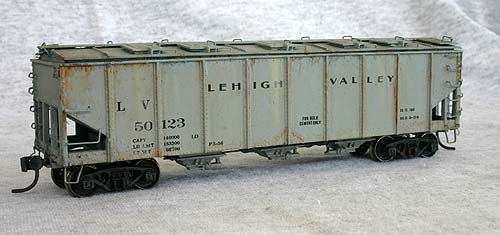
These cars were built from the LV four bay open hopper cars in the 40000-40999 series for cement service. Seeing a kitbash of this car on Jim Dalberg’s layout is what stimulated me to build this unique model. There is a photo in Craig Bossler’s CNJ/LV Color Guide Book. I did not have a drawing of this car so I used several photos and details found on the Lehigh Valley Railroad Modeler web site for this project.
Major Components:
- Lionel or Hobby Line 40’ Quad Hopper Car
- Concor 46’ PS-2 3 bay covered hopper car kit- series #233-9500
- Bowser 70 ton, 2 bay covered hopper car kits (2 needed)
- Champ L-64 black 5/64″ Globe Alphabet Letters (I think they are a little small but next size available were too big)
- Champ HD-11 black covered hopper dataHerald King H852 covered hopper
- Anthracite Society Airslide Covered Hopper car decals (came with ARHS Con-Cor car some years ago)
Start with the Lionel or Hobby Line 40’ quad hopper car that can be found at swap meets and train shows. The demolition phase begins by removing the 4 bays on the open hopper car, being careful to keep the lower side sill intact. Use a Dremel tool, chisel blade and nippers, then file the opening smooth. Take nippers and a chisel blade and remove all ladder rungs and molded on grab irons and stirrup steps.
I found a Concor 46’ PS-2, 3 bay covered hopper car kit at a swap meet that I thought had hopper bays similar to the LV Covered hopper that I wanted to model. From the PS-2, remove the 3 bays, this time concentrating on maintaining as much of the bays as possible. Now you are ready to start the construction phase.
From photos and by using the ruminants of the removed cast on details, drill holes for installation of drop and straight grabs for the ladders and for the horizontals on the ends and left hand side of the car. I use a sharp pin to mark the starting point for each hole and lubricate my drill bit in wax before beginning to drill each hole. I did find that the interior stiles of each ladder were very thin and there were some positions that I could not get a hole drilled. For those, I only drilled holes for the drop grabs in the corner posts.
Once all the holes were drilled, shorten the legs of each drop grab and test fit it in position. Do one side or end at a time and when ready to secure them, mix up a batch of 5-minute epoxy. Remove a grab, dip it in epoxy, and replace the grab back in place. Once that side or end is completed you have several minutes to fine-tune the placement to get everything straight before the epoxy hardens. For the ladder rungs where I could not get a second hole drilled in the interior stile, one leg of the drop grab went into the hole in the corner post, the other leg was positioned against the inside or outside (depending on how accurate the corner post hole was positioned) of the interior ladder stile. The epoxy is thick enough to hold it in place and once the epoxy dries the bond is very strong. Once painted, one does not notice that the ladders are built this way.
Once this is complete, take the 3 bays and sand the upper surfaces so that all 3 are the same height. Measure and cut a piece of .04” sheet styrene that will replace the floor that was removed when the quad hoppers were taken out of the car. Place the 3 hopper bays on the sheet styrene at the proper positions by lining them up with the side stakes and cement them in place. They should be spaced so that one is centered beneath the third, fifth and seventh ribs. Be careful to position the bays with their actuating mechanisms facing the correct direction. Then cement .08” x .156” strip styrene to the inside walls of the hopper as base supports for the hopper assembly. While the cement was drying, I placed the hopper assembly against the supports and positioned the supports to the correct height so that the hopper bays were at the correct height. Once dry, cement the hopper unit to the base supports. Use the hopper trim rings from the Bowser kits and some brass wire to add a little detail to the hoppers.
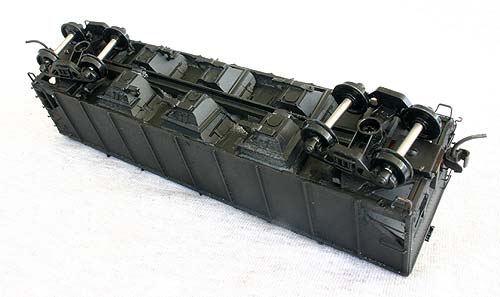
I had several Bowser ACF 70 ton, 2 bay covered hopper car kits on hand, so I used two of them for spare parts for this project. I did not like the Lionel underframe so I cut the Bowser underframe in half and used the ends as bolsters. You can use a piece of strip styrene as the rest of the center sill to reinforce the unit. Then add the brake line down the center of the center sill but do not extend it to the ends of the car or it will interfere with the trucks. Now is a good time to add any extra weight to the interior of the car.
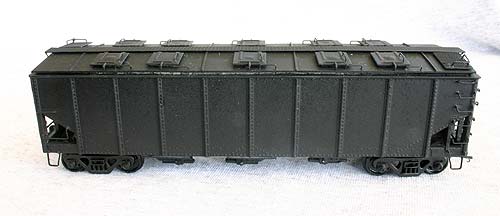
The LV Covered hopper roof has an overhanging roof eave. The Bowser roofs have the correct pitch so I decided to use them as sub-roofs for the LV model. Sand the tops smooth and cut one in half and cement it to each end of the LV covered hopper, then fit the middle section of the other roof between the first two to form a complete sub-roof. Cut a piece of .02” sheet styrene that is scored down the middle to form the roof. From photos it should slightly over hang the sub-roof on all sides. Use the roof hatches from the Bowser kits; nip off the excess plastic on the undersides that would have fit into the holes on the Bowser roof and sand the bottoms smooth. From photos place the hoppers in the correct positions and cement them in place. Use Tichy 18” straight grabs to detail the roof hatches and as roof grabs. Use 2 x 2 inch strip styrene as roof walk supports and as the four roof seams. The roof seams are lined up with the first, fourth, sixth and ninth side stakes. The Bowser roof walks were spliced together, and the end walks were detailed with DA end walk grabs, and then were cemented in place.
Use the Bowser brake components and do as much detailing as you wish. I always install the brake piping from the air reservoir to the triple valve and add a retainer valve (small piece of styrene) and retainer line down to the other brake components because they are quite visible. Add A-Line stirrup steps, style C. I scratch built the uncoupling levers with brass wire and eye bolts. Add 70 ton trucks and Kadee #5 couplers and the reconstruction phase is complete.
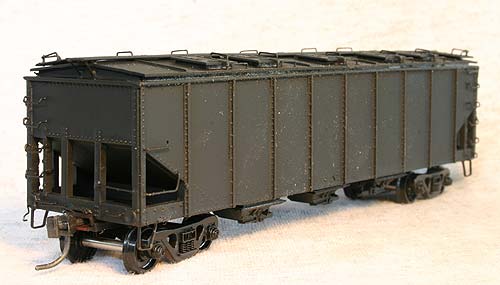
I use a flat black paint from a can as my primer. It gives me a preliminary view of the car and if I need to do any fine-tuning, I can do it prior to painting. I used Floquil SP Lettering Gray lightened with a few drops of Floquil Reefer White to paint the car. After drying a few days on the window sill in the Santa Fe sun I decorate the car for the 1950s using a variety of Champ decal sets. I did not bother to get the dimensional data exact, and as stated above I think the letters are a little too small, but passable. The car was weathered using a brush and washes of acrylic paint:
- PolyScale Tarnished Black and Cement
- Tube Acrylics: Burnt Umber and Burnt Sienna

I hope some others will be enthused and build the car. I would be happy to communicate with anyone who has an interest or has questions.
Chuck Cover (chuck.cover at gmail dot com)