The Lehigh Valley Railroad’s largest customer was Bethlehem Steel, and to serve that customer, the Valley maintained an extensive fleet of mill gondolas. In the diesel era, the largest series were the 70 ton, 52 ft 6 in and 70 ton, 65 ft 6 in fishbelly side gons. Unfortunately, there is currently no accurate plastic model of either of these important types, although Sunshine Models has released a resin kit of the 52′-6″ fishbelly side gondola.
32000-32599 were the original AAR type 56′-6″ gondolas built by Bethlehem Steel for the Lehigh Valley Railroad in 1941-42. They were delivered in freight car red with LEHIGH VALLEY spelled out in small gothic lettering, and a black diamond with no white outline located to the right of the road name.
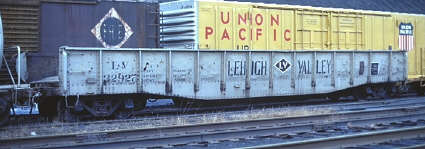
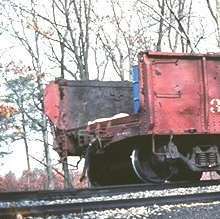
32850-33699 were similar cars built by Bethlehem Steel in 1950 and 1952. According to Craig Bossler these were delivered in black, but photos show some, perhaps repaints as in the first photo below, in freight car red.
 | The first batch of Bethlehem mill gons arrived in this freight car red scheme with the black diamond herald to the right of the road name, which was in 7 inch high lettering. The photo shows LV 33992, from the second batch, after repainting. Note the combination of shiny new paint and dented side panels! Photo from the collection of Chuck Turner, former LV CMO, via Lee Turner. |
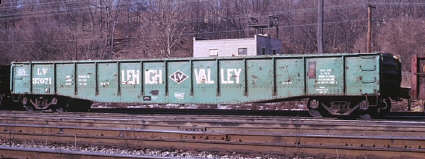
 | The delivery scheme for the 1950 batch of Bethlehem gons was black with 7 inch white gothic lettering as in the photo of the red car above, but with no herald, as shown on Chuck Cover’s model at the bottom of this page. The car shown at left has been repainted with larger Lehigh Valley lettering. Note that the Lehigh Valley lettering is closer to the top rail than in the later schemes. |
 | The gray scheme applied to a few cars in the 1970s used large black stenciled gothic lettering and a black diamond with white outline herald between the 7th and 8th ribs. |
 | The final red repaint scheme used the same stenciled gothic lettering and a black diamond with white outline herald between the 7th and 8th ribs, the same as the gray scheme but with the lettering in white. |
37000-37109 were rebuilt from both of the previous two series by USRE, and leased back to the Lehigh Valley. I’m not aware of any physical differences from the 32850-33699 series in the rebuilt cars. If you can supply some information here, please drop me a note.
 | Like the USRE rebuilt 40 ft boxcars, all of this series were painted PC green, and used white gothic lettering (heavier strokes and no stencil-type breaks in the letters) and the black diamond herald with white outline in the same position as in the gray and red cars. These cars also carried the USRE US map logo below the LV herald. |
Details and Spotting Features
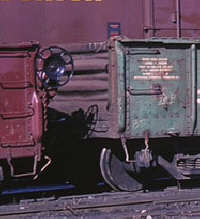 | 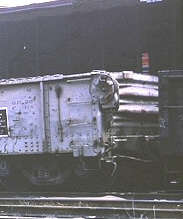 |  | ||
| The brake gear housing is mounted on a metal plate fixed to the left end post on the B end. Note the stamped reinforcing shapes on the corner posts, with the clearance for the brake wheel. | The brake gear housing is a little easier to see on this gray car. Both this car and the green car at left have the two rib dreadnaught ends. | The shape of the brake gear mounting plate can be seen in this back view with the end either down or removed. | ||
Available Models

Ted Culotta’s model built from Sunshine Models kit #70.1 shows the 1941 delivery scheme.
Sunshine Models introduced their resin kit of the 52′-6″ AAR standard Bethlehem Steel gondola in October of 2005. These models can only be purchased direct from Sunshine either by mail order or at a few train shows were they occasionally sell.
In the following table, I’ve compared the features of the three prototype LV series to those of the 50-52 ft fishbelly side gondolas available as HO scale polystyrene kits. The color-coding of the kit features reflects my subjective judgment as to what is right on (green), what could be overlooked or easily fixed if desired (yellow), and what would take more effort to put right (red).
| Car | I.L. | I.W. | I.H. | Ribs | Rib length | Spacing of side panels | Ends | Brake Gear | Floor | Other |
| 32000-32599 | 52′-6″ | 9′-6″ | 3′-6″ | 13 | Equal length, not to bottom of fishbelly | Two end panels longer than others | Drop, 2 rib bifurcated dreadnaught | Wheel on corner post | Wood | |
| 32850-33699 | 52′-6″ | 9′-6″ | 3′-6″ | 13 | Equal length, not to bottom of fishbelly | Two end panels longer than others | Drop, 2 rib dreadnaught | Wheel on corner post | Wood | |
| 37000-37109 | 52′-6″ | 9′-6″ | 3′-6″ | 13 | Equal length, not to bottom of fishbelly | Two end panels longer than others | Drop, 2 rib dreadnaught | Wheel on corner post | Wood | |
| AHM | ? | ? | ? | 13 | Full length in fishbelly | End panels longer than others | ? | ? | ? | |
| Athearn | 48′-0″ | 8′-6″ | 3′-6″ | 13 | Full length in fishbelly | End panels longer than others | Fixed, 3 rib dreadnaught | Wheel on fixed end panel | Steel | |
| Con-Cor | 52′-6″ | 8′-6″ | 3′-6″ | 13 | Equal length, not to bottom of fishbelly | End panels longer than others | Fixed, 3 rib dreadnaught | Lever on corner post | Wood | Interior braces, sits too high on trucks, has no end frame |
| Proto 2000 | 52′-0″ | 9′-0″ | 3′-3″ | 14 | Full length in fishbelly | Center & end panels longer than others | Drop, 3 rib inverted or standard dreadnaught | Wheel or lever on corner post | Nailable Steel or wood |
In body dimensions and the rib shape, the Con-Cor kit is the closest, but because of its toy-like appearance and the interior bracing on the sides, it is not acceptable out of the box. It sits to high on its trucks, and its ends are unfinished to allow the original truck mounted coupler to swing (the Con-Cor is using the molds from the old Revell kit). Chuck Cover shows how to upgrade the Con-Cor gon to provide a better representation of the LV gons in his article below.
Although in my opinion it is not the best available kit to represent the LV’s 52 ft gondolas, the Athearn kit has been released in LV colors several times. Bev-Bel has released at least the green and gray schemes, and Tioga Trains (alcrowe at rochester dot rr dot com) has released the green scheme and plans to release the red scheme.
Modeling LV 32952 from the Con-Cor gondola in HO scale, by Chuck Cover
Prototype photo showing a repainted gon in the black scheme

Model by Chuck Cover of the black scheme as delivered. See p. 75 of Craig Bossler‘s “Guide” for two photos of this scheme.
Some of the techniques for this modeling project were first published by Elden Gatwood in the The Keystone Modeler No. 16, November 2004. TKM is a great source for PRR modeling information that should be helpful to LV modelers. The LV kitbash requires a little more effort than the PRR G31/G35 kitbash, because the ribs on the LV gons were riveted, while on those on the PRR gons were welded.
1. Remove underframe and trucks from the Con-Cor model.

2. Shave off the first rib and surrounding rivets on both ends of each side. If you can do this so that the entire rib with rivet strips can be reused, it may be worth gouging out the sides, then puttying and sanding them smooth, but I found it easier to fashion replacement ribs as in step 7. In either case, preserve as much of the horizontal lines of rivets as possible. The photo above shows the new rib location compared to the stock Con-Cor kit.
3. Shave off all steps, grabs, the brake handle, brake retainer and the interior gussets on each side of the car.
4. Cut out the end doors and file the sides smooth.
5. Install Kadee couplers and boxes on the underframe.
6. Using trucks of your choice, adjust the height by filing the bolsters to get the coupler height and overall height correct. Now remove the trucks to work on the body.
7. I used Evergreen styrene #8404 to cut four replacement ribs and tapered the bottom of each to match the remaining ribs. Install them on the car sides four scale feet from each end. Replace rivets that were taken off by using 5 minute epoxy. Mix up a small amount of epoxy, dip a .015″ brass wire in it, and touch it where you want a rivet. Practice first on a scrap car or piece of styrene, as you can get too large a drop of epoxy. The epoxy will not spread out much and will harden in a few minutes. For replacing a short line of rivets this method works OK and is much less work than other methods that I have seen.

8. File an 18″ indentation in the top chord for the straight grabs that are applied there. Add grabs as appropriate on each end of the sides and stirrup steps (A-line are good and sturdy).
9. I added some styrene strip on the bottom of the ends between the coupler pocket and the sides and installed end grabs, then fabricated coupler cut levers with an eye bolt and some brass wire bent to the correct shape.
10. I took the brake wheel from a Proto 2000 kit and epoxied it in place.
11. Add weight to the bottom. I used lead shot, but sheet lead or a steel weight could also be used. (Be careful of steel weights if you are using under-track uncoupling magnets!)
12. End doors can be made from Proto 2000 or Tichy mill gon doors.
13. I painted my car in the original black scheme and decaled with Champ and Herald King decals.
14. I bought my Con-Cor gon at a swap meet and the body was already in poor shape, so the bad areas were just weathered so they looked like old damaged and rusted areas.